
Turn Black & White Raster Artwork into Microstock-Ready Vectors
A practical, repeatable Illustrator Actions workflow for tracing artwork, preparing vector paths, and exporting AI, EPS 10 and JPG files.
Spend less time repeating Illustrator commands—and more time creating artwork.
This tutorial introduces my custom Microstock Illustrator Action Set. It helps automate common preparation tasks for black-and-white typography, icons, ornamental designs, logos and other high-contrast artwork.
The workflow is designed to make production more consistent. It does not guarantee acceptance by any marketplace: every file still needs a careful visual and technical review before submission.
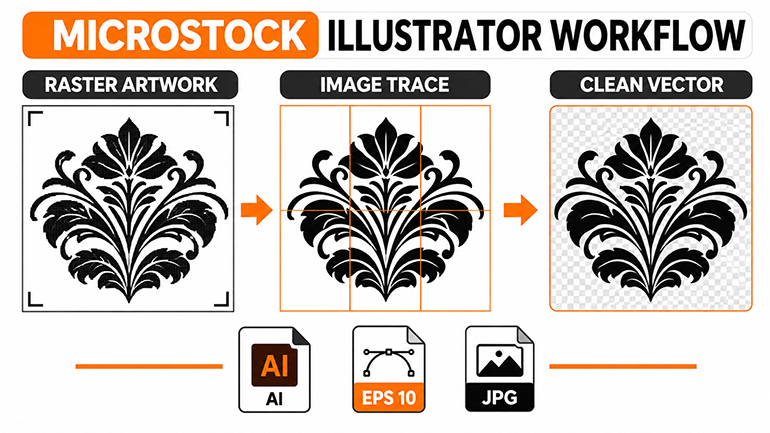
Your 9-step automation sequence
01—09
The order below matches the Actions panel sequence.
The AI file is saved immediately after white-object removal and combining—before Expand, Clean Up, outside-artwork removal and artboard resizing. It is an editable checkpoint of that stage, not necessarily a copy of the final processed file.
Before running the actions
Start with a clean source
Use a high-resolution, high-contrast black-and-white raster image. Avoid unnecessary noise and compression artifacts.
Keep a backup
Save a copy of the original artwork before running actions that delete objects, expand appearances or remove paths.
Check white details
Look for intentional white highlights, counters, holes or lettering that could be removed by the white-object deletion step.
How each action works
Follow the panel from top to bottom
6 Part Crop
The 6 Part Crop action divides a large raster artwork into six sections. The intention is to make complex or oversized artwork easier to process in smaller areas rather than tracing the entire image as one large object.
A detailed black ornamental illustration is split into six working sections. Each section can then be traced and checked, helping you identify missing details or tracing problems.
After tracing, carefully inspect the joins between sections. Correct any gaps, overlaps or alignment differences before continuing.
BW Logo Trace
The BW Logo Trace action applies the Black and White Logo Image Trace preset to convert the raster artwork into vector shapes. It is useful for bold lettering, icons, solid illustrations and other high-contrast designs.
A black logo on a white background is analyzed by Image Trace. Illustrator interprets the dark and light areas and builds vector paths from the raster source.
Image Trace results depend on source quality and settings. Zoom in to check thin strokes, small text, corners and intricate details.
Delete White Part & Combine
Image Trace can create both black and white vector objects. This action selects and deletes the white objects, then combines the remaining black artwork using the configured Pathfinder operation.
A traced black emblem contains a white background shape. The action removes the white object and combines the black vector components, leaving the artwork on a transparent background.
This action may also remove white highlights, holes, counters or white lettering that are part of the design. Review the result before moving to the next step.
Adobe Illustrator Save (AI)
At this point, the Adobe Illustrator Save action saves an editable AI file in the same working directory, using the save settings configured in the action.
After the white objects have been removed and the remaining black artwork combined, the action saves a working file such as Floral_Ornament_001.ai.
Because it runs before Expand, Clean Up, Remove Outside Artwork and Resize Artboard, this AI file may not include those later changes. To keep an AI file matching the final EPS, run another AI Save at the end of the workflow.
Expand Black & White
The Expand Black & White action expands applicable strokes and appearance attributes into editable vector shapes, then applies black as the artwork color according to the action settings.
A line-based object that still uses a live stroke is expanded so its appearance becomes a filled, editable shape.
Live text is a separate case. Use Type → Create Outlines when text needs to become vector paths. Expand alone does not automatically outline every live text object.
Clean Up
The Clean Up action uses Illustrator’s cleanup options to remove supported unwanted items, such as stray points, unpainted objects and empty text paths. These objects can be left behind during tracing or editing.
A small accidental anchor point sits far away from the main illustration. The cleanup operation can remove supported stray points and reduce document clutter.
Inspect fine details after cleanup. Do not assume every tiny object is unnecessary; some may be intentional parts of the design.
Remove Outside Artwork
The Remove Outside Artwork action is intended to remove unwanted objects or artwork outside the artboard, helping keep the document focused on the final composition.
A stray vector shape sits beyond the artboard edge and is not part of the design. This step is intended to remove that outside artwork before export.
Artwork that intentionally extends beyond the artboard may be affected. Inspect the edges and use Outline mode to confirm that no required paths have been removed.
Resize Artboard
The Resize Artboard action applies the standard canvas size used in this workflow: 5504 × 3072 pixels.
This is a personal production preset, not a universal artboard requirement for Adobe Stock, Shutterstock or Magnific. Check the current submission rules of your target platform. Some vector marketplaces assess the artwork’s visible bounding box or other file properties—not only the artboard dimensions.
Exact_Name_EPS10_JPG
The final action exports the artwork as an Illustrator 10-compatible EPS file and creates a JPG using the same base filename. Matching filenames make it easier to keep the vector file and preview together.
Magnific’s contributor workflow may require a JPG preview paired with the EPS under the same filename. Requirements can differ by marketplace and may change, so verify the current upload instructions before submitting.
Preparing files for different marketplaces
The same artwork may be submitted to more than one marketplace, but each platform has its own file, preview and metadata requirements.
Review accepted vector formats, document color mode, artboard dimensions, file-size limits and vector quality requirements.
Check EPS compatibility, artwork dimensions, font outlining, expanded objects and vector quality rules before uploading.
Check the latest EPS and JPG preview pairing instructions, filename matching, file settings and metadata requirements.
These links are starting points, not a guarantee of acceptance. Always follow the latest requirements shown in each contributor portal.
Pre-upload quality checklist
Get the Microstock Illustrator Action Set
Download the action file and use it as a starting point for your own black-and-white raster-to-vector production workflow.
Illustrator Script Installation Path
a) Adobe Illustrator 2026
C:\Program Files\Adobe\Adobe Illustrator 2026\Presets\en_US\Scripts
b) Adobe Illustrator 2020
C:\Program Files\Adobe\Adobe Illustrator 2020\Presets\en_GB\Scripts
Automate the repetitive work. Keep the creative control.
The Microstock Illustrator Action Set can speed up recurring preparation tasks—from raster cropping and Image Trace to cleanup and EPS/JPG export. A careful final inspection remains essential for every design.
Do you use custom Illustrator Actions in your microstock workflow? Share your tips or questions in the comments.
Frequently asked questions
Does this action set guarantee microstock approval?
No. It automates selected production steps, but approval depends on each platform’s technical requirements, artwork quality, originality, content policies and review process.
Why is the AI file saved before Expand?
That is the order configured in this Action Set. It creates an editable checkpoint after white removal and combining. Save another AI copy after the final step if you need an editable version that matches the final EPS.
Is 5504 × 3072 px required by every microstock website?
No. It is the custom artboard preset used in this workflow. Always verify the current technical requirements of the marketplace you are submitting to.
Why export a JPG with the EPS file?
A matching JPG can serve as a preview where a marketplace requests one. Use the same base filename when the platform requires a paired EPS and JPG submission.